


Mid taper fade for straight hair gives you a clean perimeter, a sharp neckline, and a top that holds a style all day.
The fade starts around the middle of the ear, so the sides shorten gradually without going down to bare skin. Straight hair shows every clipper line, which makes this cut look precise when it is done well.
You can finish it two ways: a side part for a neat, office-ready look, or a slicked-back top for a bolder shape. This guide compares both, explains what to tell your barber, fixes common straight-hair problems, and matches products to the finish you want. It also covers trim timing so the cut stays sharp longer.
Why a Taper Works with Straight Hair

A taper shortens the hair gradually from the top of the sides down to the neckline. A mid taper begins the blend around the middle of the ear. FashionBeans lists it as a flexible option for round, square, and oval face shapes and for straight, wavy, or slightly curly hair.
Straight hair benefits for three reasons:
- It holds a line. Straight strands lie in one direction, so a part or a comb-through looks crisp.
- It grows out cleanly. Luxe Digital notes that hair grows about half an inch a month, and a taper holds its shape longer than a high fade because it keeps more length at the sides.
- It avoids the porcupine effect. Straight hair grows outward in a stiff line. A mid taper keeps enough length around the ears that the sides do not flare as quickly as they do on a higher fade.
The tradeoff is that straight hair shows mistakes. A poorly blended taper looks like stripes, and a flat crown looks limp. The sections below show how to prevent both.
A quick definition helps here. A taper shortens the hair gradually and usually leaves some length at the edges.
A fade goes shorter, often to bare skin. A mid taper fade sits between the two: a clean blend that is not as stark as a skin fade.
Option 1: Mid Taper with a Side Part
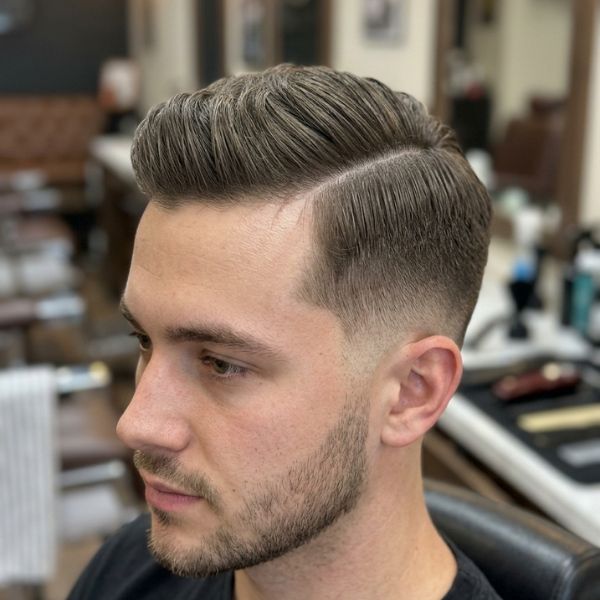
The side part is the classic pairing. It suits office settings, interviews, weddings, and anyone who wants a polished look with little drama.
FashionBeans says it works especially well on straight or slightly wavy hair that holds a part naturally.
The top usually stays around 2.5 to 4 inches. That is long enough to comb across and short enough to stay tidy.
Compare your preferences first
| Factor | Side Part | Slicked Back |
| Overall feel | Neat, classic, professional | Bold, sleek, polished |
| Ideal top length | 2.5 to 4 inches | 3 to 5 inches |
| Styling time | 2 to 3 minutes | 3 to 5 minutes |
| Typical finish | Natural to low shine | Medium to high shine |
| Best for | Work, school, formal events | Evenings, events, confident styling |
| Grow-out stage | Looks fine for longer | Needs more length and weight |
| Hair density | Works on fine or thick hair | Easier on medium to thick hair |
Use these questions to decide:
- Do you need a look that stays tidy in wind and all-day wear? Choose the side part.
- Do you like a sleek, high-contrast shape? Choose slicked back.
- Is your hair fine and thin? Start with a side part, since it hides a lighter top better.
- Do you want the most flexible option for casual and formal days? The side part wins.
How to style it
Follow these steps for a clean side part:
- Start with towel-dried hair, not soaking wet.
- Find your natural part. Brush your hair straight back, then push it forward with your fingers. The line where it separates is usually where it wants to sit.
- Use a comb to draw the part about a finger width above the outer corner of your eyebrow.
- Apply a pea-sized amount of paste or pomade. FashionBeans recommends medium hold for this look.
- Rub the product between your palms, then work it through from the back to the front.
- Comb the longer side over, then tidy the top with your fingers for a softer finish.
- If you want volume, blast the roots with a hairdryer on a medium setting before applying product.
A hard part is an optional upgrade. Your barber shaves a thin line into the hair to mark the part. It adds sharpness, but it needs more frequent visits.
Option 2: Mid Taper with a Slicked-Back Top
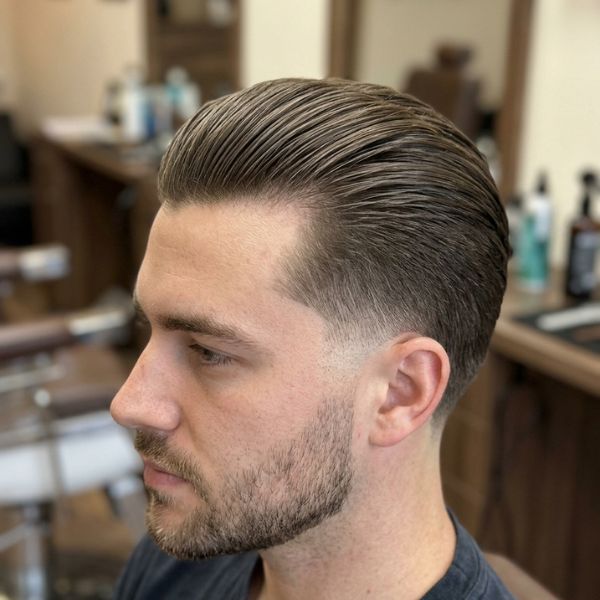
The slicked-back version is sleek, deliberate, and confident. The taper keeps the sides tight, while the top is combed straight back with a bit of shine. FashionBeans suggests keeping the top at 3 to 5 inches for this style.
It suits thick, straight hair best, since the weight helps the hair stay back. Square and heart-shaped faces carry it well, because the swept-back shape adds length and structure.
To style it:
- Dry your hair to about 80 percent, then comb it straight back.
- Warm a small amount of pomade or gel in your hands. Start with less than you think you need.
- Run your fingers from the front hairline to the crown, then finish with a comb.
- Check the sides. The taper should look clean against the slicked top.
- If the front keeps falling forward, tilt your head down and comb it back from the roots.
A natural-looking slick back needs flexible hold rather than a hard lacquered finish. If the hair looks greasy, you used too much product.
What to Ask Your Barber
Clear words prevent most bad haircuts. Barbers use specific terms, and most sites skip the exact phrasing, so use this checklist.
Bring these details to your appointment:
- The taper height: say “mid taper” so the blend starts around the middle of the ear.
- The bottom length: ask for a guard number or say “close but not skin.” A common range is a number 1 or 2 at the neckline, rising to a 3 or 4 where it blends in. Your barber will adjust it to your head shape.
- The top length: give a measurement, such as “three inches on top.”
- The finish: say “side part” or “slick back” so the barber cuts the top with that direction in mind.
- The neckline: choose a natural taper for a softer edge or a blocked shape for a sharper edge.
- The tool for the top: ask for scissor work or point cutting on top. Straight hair benefits from point cutting because it removes bulk and adds movement.
A simple script works well: “Mid taper, number 2 at the bottom, blended up. Three inches on top, cut for a side part. Natural neckline.”
Show a photo when you can. Pictures remove guesswork about contrast, height, and neckline shape.
Common Straight-Hair Problems
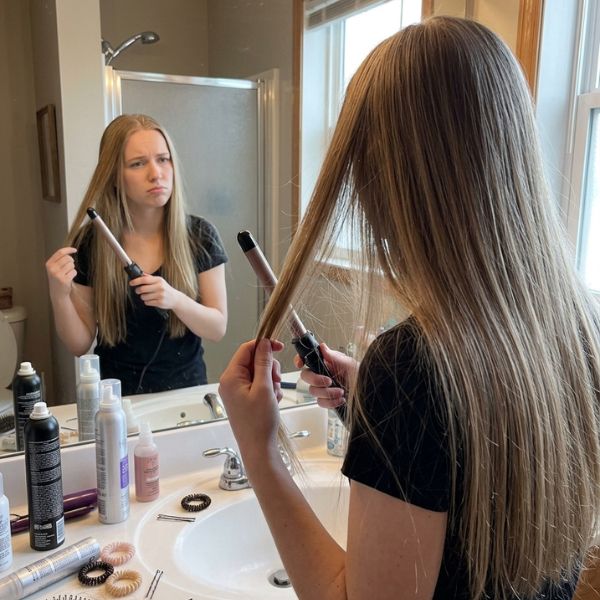
Straight hair shows flaws more quickly than wavy or curly hair. Here are the three most common issues and how to fix them.
Read more: Dégradé Effilé Mi-Haut pour Cheveux Bouclés — Les 17 Meilleurs Styles & Guide d’Entretien (2026)
Visible guard lines
Guard lines are the stripes you see where one clipper length meets the next. They happen when the barber does not blend the transitions.
Straight hair makes the stripes more obvious because the hairs lie flat and the contrast stays visible.
To fix it:
- Ask the barber to blend with a smaller guard or clipper-over-comb.
- Request a “soft blend” instead of a hard line.
- Do not wait until the cut is fully grown out. Visible lines grow worse as the sides lengthen.
- If you see lines the same day, go back. A good barber will fix it.
Flat top
Straight hair often falls flat because there is little natural lift. A top that is too heavy or too uniform in length makes this worse.
To add lift:
- Ask your barber to texture the top with point cutting or thinning shears.
- Use a hairdryer at the roots, brushing upward and back.
- Apply a pre-styler such as a sea salt spray before blow-drying. Straight-hair guides often recommend it for grip and texture.
- Try a volumizing powder at the crown for extra hold.
- Avoid heavy oil-based products. They weigh the hair down.
Sides that stick out
When the sides grow, straight hair can push out and make the head look wider. This is sometimes called the mushroom effect.
To control it:
- Book your next visit before the sides get too thick.
- Ask for a slightly tighter taper around the ears next time.
- Comb the sides down with a bit of product while the hair is damp.
- Use a small amount of light-hold product to keep the hair flat against the head.
- Ask your barber to remove weight from the sides with a thinning technique.
Product Choice by Finish
| Finish | Product Type | Hold | Shine | Best For |
| Natural, soft | Light paste or cream | Light to medium | Low | Everyday side part |
| Matte, textured | Clay or fiber | Medium to strong | None | Side part with texture |
| Polished, classic | Water-based pomade | Medium | Medium | Clean side part |
| Sleek, shiny | Gel or strong pomade | Strong | High | Slicked back |
| Max volume | Powder or sea salt spray | Light | None | Lifting a flat crown |
A few practical tips:
- Use less than you think. Straight hair gets greasy faster than textured hair.
- Rub product between your palms first so it spreads evenly.
- Use a water-based pomade when you want easy washout.
- Clarify your hair once a week to remove buildup. Product residue weighs straight hair down.
- Avoid products that make hair stiff or flaky.
Clay and powder suit a matte look, while pomade and gel suit sleek styles. Pete & Pedro makes the same distinction: clay for a strong matte finish and pomade for flexible hold with shine.
When Is It Time for a Trim?

A taper fade grows out gradually, but the clean edges fade first. Most barbers and style guides agree on a window:
- Every 2 to 3 weeks: for a sharp, tight finish with a hard part or a lower neckline.
- Every 3 to 4 weeks: for a regular mid taper that keeps its shape.
- Every 4 to 6 weeks: for a softer taper with a natural neckline. FashionBeans suggests this range for a side part.
Signs it is time to book:
- The neckline looks fuzzy.
- Hair around your ears is touching them.
- The part loses its definition.
- The top no longer stays in place.
- The sides look wider than a week ago.
Book your next appointment before you leave the chair. It prevents the long gap that leads to a messy grow-out.
Read more: Low Taper Fade Styles for Straight Hair: Best Haircuts for Men
Styling Reference
Keep this quick reference nearby. It sums up the full routine for both looks.
- Start with clean, towel-dried hair.
- Add a pre-styler if your hair is flat.
- Blow-dry at the roots in the direction you want the hair to sit.
- Apply a pea-sized amount of the right product.
- Comb into place with a part or a back sweep.
- Check the sides and neckline.
- Finish with a light mist of spray if you need extra hold.
Mani
A short two-minute routine for busy mornings:
- Towel dry, then comb the hair into direction.
- Warm a small amount of paste in your hands.
- Run it through from back to front.
- Check the part or back sweep once in the mirror.
That is enough to keep a fresh mid taper fade looking tidy on most days.
Related visual guides
Photos make the decision easier. Browse these sources to compare real examples:
- Mid Taper Fade Haircuts at Men’s Hairstyles Today for side part and slick back examples.
- FashionBeans mid fade guide for part, fade, and face shape pairings.
- Luxe Digital taper fade guide for taper types and step-by-step visuals.
Save two or three photos with the same part direction and similar hair density. Bring them to your barber.
Leave a Reply Cancel reply
Which style are you leaning toward, the side part or the slicked-back version? Share your hair type and the product you use in the comments, and others can compare notes.
Read more: Burst Fade vs Taper Fade: Differences, Maintenance & Which to Choose
Conclusion
A mid taper fade for straight hair works because it gives clean edges and flexible styling at once. Choose the side part for a neat, versatile everyday look.
Choose the slicked-back version for a sleeker, bolder shape. In both cases, clear barber wording, the right product, and regular trims decide how good the cut looks.
Start with your routine. If you want a quick, tidy morning, go with the side part. If you enjoy styling and want more impact, go with the slick back.
Then book your next visit before you leave the chair.
FAQs
What is a mid taper fade?
It is a haircut where the sides and back shorten gradually, starting around the middle of the ear, with longer hair left on top.
Is a mid taper fade good for straight hair?
Yes, because straight hair holds clean lines and styles well, though it also shows blending mistakes more.
Which is better, a side part or slicked back?
A side part is easier and more versatile, while slicked back is sleeker but needs more length and product.
How long should the top be?
About 2.5 to 4 inches works for a side part, and 3 to 5 inches suits a slick back.
What product is best for a mid taper fade?
Use paste or clay for a natural or matte look, and pomade or gel for a sleek, shiny finish.
How often should I get a trim?
Every 3 to 4 weeks keeps a mid taper fade sharp, and every 4 to 6 weeks works for a softer taper.
How do I stop my straight hair from looking flat?
Ask for texture on top, blow-dry at the roots, and use sea salt spray or volumizing powder.
Why do the sides of my hair stick out?
Straight hair grows outward as the sides lengthen, so trim sooner and keep the sides combed down with light product.

Reyansh is an experienced fashion writer with 6+ years of writing experience, passionate about fashion trends, styling ideas, and modern looks. He creates simple, engaging content that helps readers discover their personal style with confidence.